Advanced
⏱ 55 min read
© Gate of AI 2026-04-19
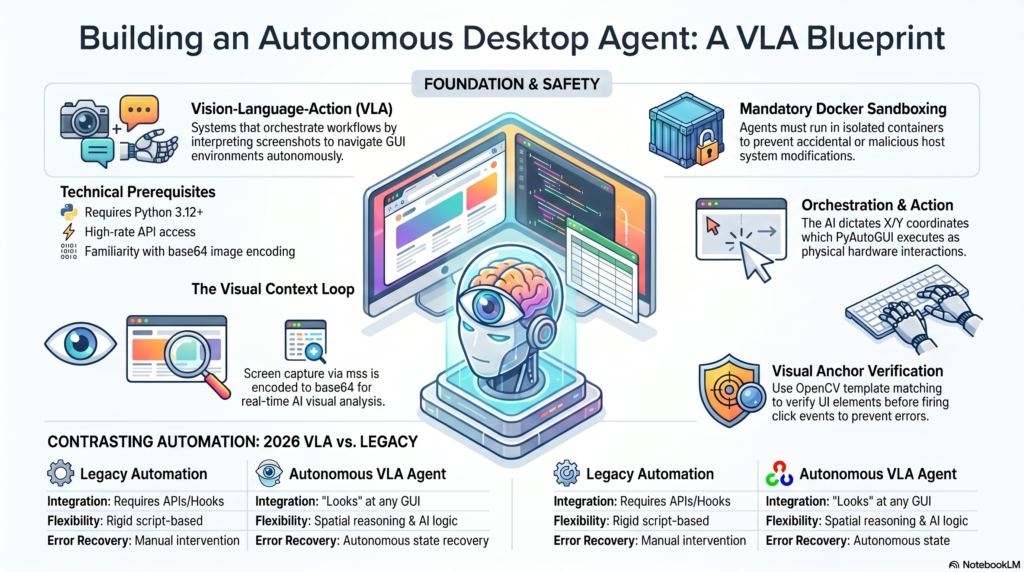
Step out of the terminal and into the GUI. Learn how to orchestrate Vision-Language-Action (VLA) workflows to let AI autonomously navigate your desktop, interact with legacy software, and extract visual data.
Prerequisites
- Python 3.12+ (with
pip) - Anthropic Tier 3+ API Access (for high-rate Claude 4.5 image processing)
- Docker (Strictly required for sandboxing the agent to prevent accidental host system modifications)
- Familiarity with screen coordinate mapping and base64 image encoding
What We’re Building
Standard LLMs interact via text streams. In this 2026 tutorial, we are building a Visual Autonomous Agent. Using Anthropic’s upgraded Claude 4.5 “Computer Use” API architecture, we will create a Python loop that takes a screenshot, sends it to the AI, parses the AI’s intended actions (like moving the mouse to specific X/Y coordinates or typing text), and executes them using PyAutoGUI.
This fundamentally solves the “legacy software” problem, allowing your AI to automate enterprise tools that lack APIs by simply “looking” at the screen and clicking, just like a human.
Setup and Environment Hardening
Because agentic UI control is inherently risky, we strongly advise running this inside a Dockerized Ubuntu container with a virtual frame buffer (Xvfb). For local testing, install the necessary control libraries.
pip install anthropic pyautogui mss opencv-python python-dotenvConfigure your environment variables. Never run this script with root privileges on your primary machine.
# .env file
ANTHROPIC_API_KEY=sk-ant-your-api-key-here
SAFE_MODE=enabled # Custom flag to require human confirmation before clicks
Step 1: The Visual Context Loop
The agent needs “eyes.” We use mss to capture the screen rapidly and encode it into base64, which is the standard format required by the 2026 multimodal vision endpoints.
import mss
import base64
import pyautogui
from PIL import Image
import io
def capture_screen_base64():
with mss.mss() as sct:
# Capture primary monitor
monitor = sct.monitors[1]
sct_img = sct.grab(monitor)
# Convert to standard PIL Image
img = Image.frombytes("RGB", sct_img.size, sct_img.bgra, "raw", "BGRX")
# Downscale slightly to save tokens and reduce latency
img.thumbnail((1280, 720))
buffered = io.BytesIO()
img.save(buffered, format="JPEG", quality=85)
return base64.b64encode(buffered.getvalue()).decode('utf-8'), img.size
Step 2: Defining the “Computer Use” Tool
We configure the Anthropic client, specifically defining a tool that allows the model to dictate mouse and keyboard actions based on its advanced spatial reasoning.
import anthropic
client = anthropic.Anthropic()
computer_tool = {
"name": "computer_interaction",
"description": "Execute physical keyboard and mouse commands on the desktop.",
"input_schema": {
"type": "object",
"properties": {
"action": {"type": "string", "enum": ["click", "type", "scroll", "move"]},
"coordinates": {"type": "array", "items": {"type": "integer"}, "description": "[x, y] coordinates for mouse actions"},
"text": {"type": "string", "description": "Text to type if action is 'type'"}
},
"required": ["action"]
}
}
Step 3: The Autonomous Orchestration Engine
Now, we build the recursive loop. The agent views the screen, decides the next logical step to fulfill your prompt, outputs the tool call, and our script executes the PyAutoGUI commands physically.
def execute_agentic_task(objective):
print(f"Task Started: {objective}")
messages = [{"role": "user", "content": [{"type": "text", "text": objective}]}]
for step in range(10): # Hard limit to prevent runaway loops
b64_image, current_resolution = capture_screen_base64()
# Append the current visual state to the prompt
messages[-1]["content"].append({
"type": "image",
"source": {"type": "base64", "media_type": "image/jpeg", "data": b64_image}
})
response = client.messages.create(
model="claude-4-5-sonnet-20260215", # Updated to the 2026 flagship model
max_tokens=1024,
tools=[computer_tool],
messages=messages
)
# Check if the model decided to use the computer
if response.stop_reason == "tool_use":
tool_call = response.content[-1]
action = tool_call.input["action"]
print(f"Agent executing: {action}")
if action == "click":
x, y = tool_call.input["coordinates"]
# Scale coordinates back up to native resolution
pyautogui.click(x, y)
elif action == "type":
pyautogui.write(tool_call.input["text"], interval=0.05)
# Append tool result to memory so the agent knows it succeeded
messages.append({"role": "assistant", "content": [tool_call]})
messages.append({
"role": "user",
"content": [{"type": "tool_result", "tool_use_id": tool_call.id, "content": "Success"}]
})
else:
print("Task Completed by Agent.")
break
execute_agentic_task("Open the calculator app, type 500 * 42, and click equals.")
OpenCV template matching to verify the target button is exactly at the X/Y coordinates before firing the pyautogui.click() event.Testing Your UI Agent
Run your script in a clean workspace. Ensure your terminal window is not blocking the application the AI is trying to interact with.
python visual_agent.pyYou will see the mouse move autonomously as the AI calculates the visual grid and executes the operating system commands in real-time.
Scaling to Enterprise Production
- Browser-Native Sandboxing: Instead of controlling the host OS, bind this logic to a headless Playwright instance for scalable web automation.
- Asynchronous Action Trees: Combine this with LangGraph to have one “Manager Agent” analyzing the screen, while “Worker Agents” execute rapid keystrokes.
- State Recovery: Program the agent to recognize error popups visually and autonomously execute recovery routines (closing the popup and retrying).
