 درس تقني
متقدم
⏱ ٥٥ دقيقة قراءة
© بوابة الذكاء الاصطناعي ٢٠٢٦-٠٤-١٩
اخرج من المحطة إلى واجهة المستخدم الرسومية. تعلم كيفية تنسيق تدفقات العمل للرؤية-اللغة-الفعل (VLA) لتمكين الذكاء الاصطناعي من التنقل بشكل مستقل في سطح المكتب، والتفاعل مع البرامج القديمة، واستخراج البيانات المرئية.
شاهد الشرح العملي
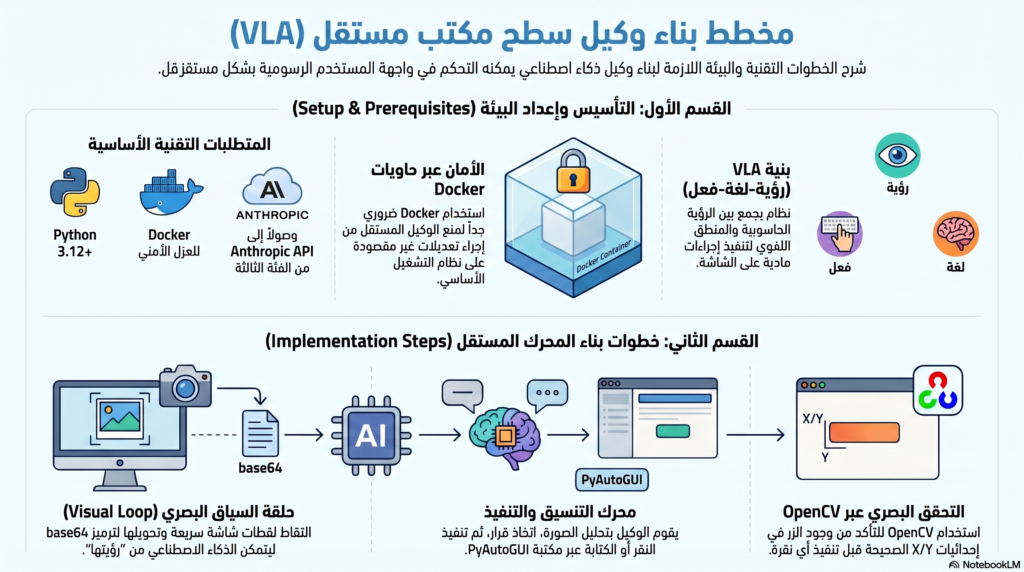
المتطلبات الأساسية
- Python ٣.١٢+ (مع
pip) - وصول إلى Anthropic Tier ٣+ API (لمعالجة صور Claude 4.5 بمعدل مرتفع)
- Docker (مطلوب بشكل صارم لعزل الوكيل لمنع التعديلات العرضية على نظام المضيف)
- الإلمام بتعيين إحداثيات الشاشة وترميز الصور بصيغة base64
ما الذي نبنيه
تتفاعل LLMs القياسية عبر تدفقات النصوص. في هذا الدرس التقني لعام ٢٠٢٦، نقوم ببناء وكيل مرئي مستقل. باستخدام بنية واجهة برمجة التطبيقات “استخدام الكمبيوتر” المُحدثة لـ Claude 4.5 من Anthropic، سنقوم بإنشاء حلقة Python تأخذ لقطة شاشة، وترسلها إلى الذكاء الاصطناعي، وتفسر الإجراءات المقصودة من الذكاء الاصطناعي (مثل تحريك الماوس إلى إحداثيات X/Y محددة أو كتابة نص)، وتنفذها باستخدام PyAutoGUI.
هذا يحل بشكل أساسي مشكلة “البرامج القديمة”، مما يسمح للذكاء الاصطناعي بأتمتة أدوات المؤسسات التي تفتقر إلى واجهات برمجة التطبيقات ببساطة عن طريق “النظر” إلى الشاشة والنقر، تمامًا مثل الإنسان.
إعداد وتحصين البيئة
نظرًا لأن التحكم في واجهة المستخدم الرسومية بالوكيل ينطوي على مخاطر بطبيعته، ننصح بشدة بتشغيل هذا داخل حاوية Ubuntu معزولة باستخدام إطار افتراضي (Xvfb). للاختبار المحلي، قم بتثبيت مكتبات التحكم اللازمة.
pip install anthropic pyautogui mss opencv-python python-dotenvقم بتكوين متغيرات البيئة الخاصة بك. لا تقم بتشغيل هذا البرنامج النصي بصلاحيات الجذر على جهازك الأساسي.
# .env file
ANTHROPIC_API_KEY=sk-ant-your-api-key-here
SAFE_MODE=enabled # علامة مخصصة لطلب تأكيد بشري قبل النقر
الخطوة ١: حلقة السياق المرئي
يحتاج الوكيل إلى “عيون”. نستخدم mss لالتقاط الشاشة بسرعة وترميزها إلى base64، وهو التنسيق القياسي المطلوب من قبل نقاط النهاية للرؤية متعددة الوسائط لعام ٢٠٢٦.
import mss
import base64
import pyautogui
from PIL import Image
import io

def capture_screen_base64():
    with mss.mss() as sct:
        # التقاط الشاشة الرئيسية
        monitor = sct.monitors[1]
        sct_img = sct.grab(monitor)

        # تحويل إلى صورة PIL قياسية
        img = Image.frombytes("RGB", sct_img.size, sct_img.bgra, "raw", "BGRX")

        # تصغير الصورة قليلاً لتوفير الرموز وتقليل وقت الاستجابة
        img.thumbnail((1280, 720))

        buffered = io.BytesIO()
        img.save(buffered, format="JPEG", quality=85)
        return base64.b64encode(buffered.getvalue()).decode('utf-8'), img.size
الخطوة ٢: تعريف أداة “استخدام الكمبيوتر”
نقوم بتكوين عميل Anthropic، مع تحديد أداة تسمح للنموذج بإملاء إجراءات الماوس ولوحة المفاتيح بناءً على استنتاجه المكاني المتقدم.
تابع القراءة
سجل دخولك مجاناً لقراءة المقال كاملاً والوصول إلى أدوات الذكاء الاصطناعي.
تسجيل الدخول / إنشاء حساب